How To Do It Right The First Time!
In this post, I am inviting you to join me on a journey that starts at buying a bus for conversion to a motorhome and ends after living in it full-time 10 years down the line. I will divulge a lot of secrets and tips that will save anyone planning a bus conversion to RV, a lot of headache, time and money.
Index
Finding a Bus
Nice Little Extras
Weekends Turned To Weeks And Weeks To Months
Finding a Park
The Hardest Part – Unclutter
Finding a Bigger Bus
Just Right
The Grand Piano
The Porta Bote
The Floor
Some Mistakes
Important – Cable Sizing
The Solar Installation
The Good Life
The Sound System
Yellow Paint
Suspension
The Dreaded Rust
The Kitchen
The Donkey Hotplate
Finding a Bus
Back in 2007, the travel bug bit us and we started looking for a Motorhome / RV. We had a few prerequisites like it must be less than $35000, it had to have a “table-for-two” where we could sit down and enjoy our meals.
Cupboard space was a big consideration. We did not plan a lounge because we didn’t plan to entertain. We are only 2 people. So, one double bed was enough. It had to have a shower and toilet, fridge, gas stove and all the standard, usual bits and pieces.
We went to look at a few and found an old Isuzu Journey 6 meter motorhome that fitted the bill. We bought it and took it home. We gradually started “moving in”. It so happened that it was winter. We used to enjoy spending time in the bus over weekends, getting it ready to roll.
One of the main reasons we got an Isuzu was the overhead lockers. We looked at some Mitsubishi Ferozas that were very nicely done but with the windows ending so close to the roof, there were none with overhead lockers.
Isuzu and Nissan seemed to be the only ones with a high roof and quite a bit of space above the windows. This was ideal for fitting overhead lockers.
The fit-out in the Isuzu was cleverly done for such a small wagon. I was amazed to see how much stuff we fitted in. Having a mid-motor, the boot was available for storage. It also held the 9 kg gas bottle that fed the water heater, stove and 3-way fridge.
Nice Little Extras
The motorhome had a shoe rack directly to the right as you entered. This turned out to be one of the most handy features. We soon realized the value of being able to hang your wet or muddy shoes on the hooks when getting in. This kept the floor clean and tidy and when you need to go out, no need to search for your shoes.
Weekends Turned To Weeks And Weeks To Months
One chilly Sunday, instead of moving back into the house, we found the bus so cozy, we decided to stay. This went on for many days. Whenever we needed something, we’d go fetch it in the house and get straight back into the bus.
We found it to heat up so fast when it is cold at a fraction of the cost of heating the house. One thing lead to another and we decided to get rid of the house. Why stay in your own driveway just to have your weekends occupied with gardening and lawn mowing?
Finding a park
This happened around mid 2007. Finding a park was not too difficult. I still had full time employment as “Mobile Mechanic”. We moved with our bus into a campground where permanent parking was available at an affordable price. I commuted to work and back every day. Weekends and holidays we would hit the road and explore the country.
The Hardest Part
We had a lot of our stuff stored in a container on a friend’s property and also had way too much stuff with us. We HAD TO UN-CLUTTER! This was by all means the hardest thing to accomplish. (In fact – we are still busy un-cluttering to this day). Those who have tried it before will be able to share the passion.
Anyways, we realized that we cannot live comfortably in a 6 meter bus if we plan to do it permanently. I guess you know where this is leading to?
Correct, time to get a bigger bus.
Finding A Bigger Bus
We started searching the Internet, the importers, auctions and dealers for a bus. We looked at hundreds of motorhomes online and went to look at lots from dealers. We just could not find what we were looking for. Having stayed in the 6 meter for about 6 months, we had a good idea of what we wanted and needed in a “permanent” motorhome.
Again we found that Isuzu and Nissan were the only ones with reasonable space for lockers above the windows. We decided to have one fitted out to our spec and thus the hunt began for an Isuzu or Nissan 9 meter bus. Originally we decided to go for 8.5 meters but I promised my wife a piano – a grand piano. So to fit that, we had to stretch to 9 meters.
Just Right
After a lengthy search for weeks on end, we found an ugly duckling on the Net that seemed like the right thing for us. We contacted the dealer. To our amazement, things just fell into place. They were importers looking to get rid of the bus to free up money for their next shipment.
The bus was a difficult seller for them because it was a yellow Japanese roadworks training bus. So it only had a few benches with laptop tables and cupboards inside which turned out useless for public transport companies.
I booked a plain in Auckland, flew to South Island, checked it out and returned with a good report. 3 days later, me and my wife flew down again and drove it back to base camp.
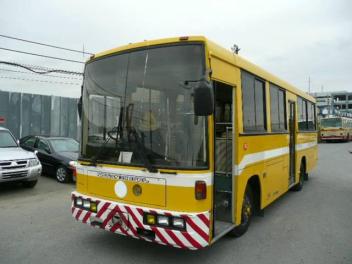
I spent afternoons and Sundays, ripping out all the air-con ducting, ceilings, benches and tables and whatever else that had to go.
I removed the massive 3 cylinder Isuzu diesel engine that was driving the air-con, from the locker under the bus.
This saved us a heap of space and weight. Luckily, in New Zealand, being cool to cold mostly, we knew that air-con would be wasted space.
Obstacles:
The Grand Piano
To fit a grand piano in a bus is no small challenge. My wife searched the world to find the smallest baby grand piano available. One day, she found it and there was one left, guess where…..in the heart of the South Island. This was immediately ordered and on its way.
[amazon_link asins=’B01EU1FRVQ,B01AR3CUPC’ template=’ProductCarousel’ store=’rvm0504-20′ marketplace=’US’ link_id=”]
A few days later, the BIG box with the SMALL piano arrived. My wife drew the plans for the internal bus layout, including the spot for the piano.
With the limited space, the piano had to be mounted on top of the freshwater tank. So, the legs were removed. The rear of the piano covers the tank and there are 2 sets of drawers, one on each side of the piano stool to which the piano is mounted instead of its own legs.
The Boat
One thing you cannot be without in New Zealand, is a boat. I think this is likely the country with the most boats per capita in the world.
Because this country is encircled by sea and only a few hundred km wide at the widest point, you are at the beach most the time wherever you go. That means fishing, skiing and whatever else you like to do at the beach.
So, I have a Porta-Bote which I had to find a place for on the bus. In the photo you can see where it ended up.
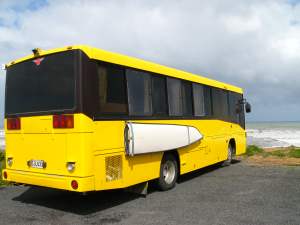
It really makes for easy rig and stow of this little boat which is powered by a 2.5hp Suzuki outboard. The motor, oars, seats and fishing gear go into the locker under the floor (where that Isuzu 3 cylinder and the AC unit were mounted :))) .
The Floor
The passageway in the bus was on a lower level than the tables and benches either side. The floor had to be lowered right through to the same level. We contacted various motorhome builders for quotes to do the major part of the fit-out.
We wanted to get it done in a year and would not have come about with me still working full-time. Once we decided on a builder, the bus was taken to their shed.
We agreed that I would work every week day from 5pm to 10pm and every Sunday 8am to 10pm to do some of the fit-out and to keep the overheads down. This worked great.
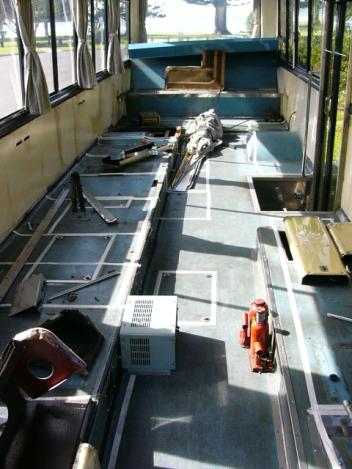
The floor was leveled and a metal frame welded in place. On top of this, they fitted sheets of 16mm plywood. On top of that, I bonded Saligna tongue and groove flooring (8mm thick). As previously stated, it is insufficient weatherproofing. It needs at least a layer of spray foam or Styrofoam underneath.
We did a similar shoe rack to the one in the small bus. We also had a double sink fitted in the kitchen because we like to rinse the dishes after washing. The bus builder had a hard time with all our weird ideas. They kept trying to get us to change our minds. Luckily we didn’t.
Some Mistakes
Looking back after living in the bus for 10 years, there are a few things that I would do differently. One is floor insulation. I would spend a lot more time and dollar on proper floor insulation.
I think people underrate the amount of heat disappearing through the floor (more on this later). I would spend a lot more time and effort on insulating the walls with spray foam before the panels go up.
[amazon_link asins=’B0012UP804,B01N21KQ4I,B0002YW0W0,B06XHQ26GY’ template=’ProductCarousel’ store=’rvm0504-20′ marketplace=’US’ link_id=”]
I would have a proper channel fitted from the battery compartment to the display/control panel inside the bus for easy addition or alterations of cabling.
We asked the bus builder if there is a way to have the 12V house battery charged by the 24V alternator. They fitted a Redarc 30A even charger. This lasted halfway through our first trip and went up in smoke. On return, we were told, “sorry, it cannot handle the Amps”.
I would have expected them to have worked out if it would make it or not instead of trialling it at my expense!
Always Use Heavier Gauge Cable Than Initially Required
We had the horrible experience of upgrading our solar system to almost double the power, only to find that the original cable from the controller to the battery cannot handle more than 35 amps even though the Flexmax Controller is rated for max 80Amp.
I expected a “professional” bus builder to know that it is just proper practice to fit 80Amp cable to a controller capable of 80 Amp output. It worked out to be a MAJOR job fitting heavier cabling due to the lack of a channel for the cabling.
The wiring was routed behind the panels and cupboard wherever they found the shortest route. Many of the panels were permanently mounted with Marine Silicone.
[amazon_link asins=’B0000AYC0L,B0000AY6B0,B000H8W9V8′ template=’ProductCarousel’ store=’rvm0504-20′ marketplace=’US’ link_id=”]
I spent hours trying to remove the panels without wrecking it. The job is still in progress at this moment. Meanwhile I had to limit the Controller output to 35Amp to save the wiring. What are the chances of such a bus builder getting a reference from me? Shortcuts can cost you big in business.
The Solar Installation
I sourced some Uni-Solar flexible stick-on panels. Those years, solar was very expensive and we fitted 408 Watts total. Few RVs were fitted with that much solar at the time. This lasted us well for a few months until the old house batteries packed a sad.
I searched online and did a lot of investigation and research into different battery technologies. We decided to go for a LiFePO4 battery. That is the chemical abbreviation for Lithium Ferrous Polymer.
We bought 8 x 400Ah 4V Cells to total 16v 800Ah battery bank which fitted into the same cavity as the a 400Ah FLA (Flooded Lead Acid) bank.
[amazon_link asins=’B06XX197GJ,B07BGD9LTM,B07195DWJP,B07F2SC3J1′ template=’ProductCarousel’ store=’rvm0504-20′ marketplace=’US’ link_id=”]
The installation was done by myself This took us a long way until 2017 when I decided it is time to try and get rid of the generator. We used the generator only during winter when away from mains power. It was so seldom used that it felt like a waste of valuable space, yet we could not go without it.
The price of solar dropped tremendously over the last 5 years and a bigger solar system was the answer.
I invested in twelve 100Watt solar panels. Ten of these are used for the house battery bank and the other two are used to keep the starting batteries in shape. For a video and more on this installation, visit this post
The Good Life
After a year, the bus was almost completed apart from the final floor covering and solar panels.
We found another park to stay and moved our bus to its new parking spot in Stillwater. This was a really pleasant spot. We were a mere 15 meters from the water and about 100m from the boat ramp and jetty.
Many a day after work, at around 5:30pm, I would throw my fold-up boat into the river, motor down into the sea and do some serious fishing.
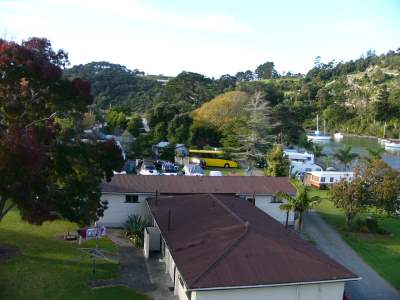
So, most evenings we had fresh fish for dinner. What more can one wish for?
This was life for around 2 years. Then the ‘credit crunch’ hit. The mobile service was discontinued and I was without job.
So we decided to start touring. We were planning to meet motorhome friends down the line and then do a joint adventure through the South Island. More about this in the next post.
The Power Amp
OF course you need some good sound in your RV. So I installed 6 speakers into the ceiling from front to rear and connected this to a Philips car audio/cd player, wired through a 1400Watt V12 amplifier. Not that I like loud music, but I don’t want to stress my ears to hear it either. This is hooked up to the baby grand piano too.
[amazon_link asins=’B00ZC84RSQ,B078V26FY2,B01LZH45MI,B00NC59P88′ template=’ProductCarousel’ store=’rvm0504-20′ marketplace=’US’ link_id=”]
After a few years of use, the amplifier just stopped working. I removed it, stripped and investigated it and found that some of the resistors, caps and diodes had severely corroded legs. The I realized that it must be from moist being mounted to the floor under the dashboard.
[amazon_link asins=’B00MNTXP0S,B07FND98QL,B00081F84Y’ template=’ProductCarousel’ store=’rvm0504-20′ marketplace=’US’ link_id=”]
I sent it in to a repair shop and on the return, I opened it up again, sprayed the pc board with lanolin, closed it up and hooked it up to the sound system.
We had a good 7 years use from it before it played up again last week. Yesterday, I removed it and checked it out to find 2 components with corroded legs. These must have been missed at the previous coating with Lanolin. The rest of the board looks like new.
I cleaned the legs by scratching off the corrosion using a utility knife. I then re-soldered and re-coated it and it seems to have sorted the problem. I am listening to music through the amp as I am writing this (playing some of ABBAs greatest hits).
[amazon_link asins=’B004DBAUBQ,B079GRFV1C,B00973AVG4′ template=’ProductCarousel’ store=’rvm0504-20′ marketplace=’US’ link_id=”]
Never underestimate the value of lanolin when building a motorhome, RV or travel trailer. If you know of any damp areas, get in there with your lanolin and cover the surfaces. It will save you lots of trouble and money in the long run.
Yellow Paint
Our bus, being a roadworks training unit originally, it came in the typical “roadworks yellow” color. Not wanting issues with a complete color change, we decided to keep it yellow, just with a new shiny overcoat. After days of sanding, stripping and masking, it was ready for a coat of 2K – I wish.
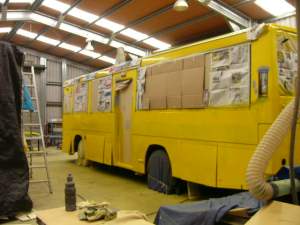
It took 7 coats just to merely cover. So, if you like yellow, be prepared. Yellow is one of the worst colors when it comes to paint. It just stays transparent. This is not only my experience. I researched it and it seems to be a trend.
Anyway, in the end it was shiny yellow, and so was the whole workshop inside. It took another day to clean up the over-spray. 2K is good paint but sticky like enamel and slow drying. Very easy to make a mess – as we soon realized.
Suspension
The bus weighed 10 Tonne all up when done. On the first trip, we noticed that the bus was leaning severely through corners. This kicked off a new search for answers. We ended up having the leaf springs re-tensioned and extra blades added to give it a 70mm lift. This proved very effective and worth the dollar.
However, it was not the way I wanted yet. So, I replaced the front shock absorbers. This brought about some more stability and we lived with it for around 9 years. The bus came with Bridgestone snow tyres. Not the best for the open road but being new, I did not see my way clear spending thousands on other tyres – MISTAKE!
Last year, while parked up, the one inner rear tyre blew out the sidewall. (Glad I wasn’t doing 90km/h down the motorway at the time).
Not being able to find another snow tyre, I replaced with one of the front tyres and fitted 2 new Dunlops on the front. To my surprise, on the next trip, I noticed a major difference (the biggest to date) in cornering.
The bus does not lean half as much as it used to. We are so pleased with the handling now that we decided to leave the snow tyres on the rear until it needs replacing for whatever reason.
The DREADED RUST!
When we started the fit-out, I noticed a bit of rust under one of the windows. I removed the complete window frame and found that the rust spot was much more serious than originally thought.
I ground the rust back to metal with an angle grinder. I then put some rust converter on. Once dry, I covered it with ample Marine Silicone and refitted the frame. This is now 10 years later and no sign of any rust from that area whatsoever.
A steel motorhome needs regular investigation to keep rust at bay, especially if you tour the coastline often or in New Zealand. NZ has a very high humidity in general (not called the land of the great white cloud for nothing). Rust just loves it. It is best to stay away from steel if at all possible. There are alternatives like fiberglass, aluminum or galvanized steel but it usually comes at a price.
I was willing to take the chance because I have done lots of rust repairs in my life.
The Kitchen
We decided to go with a gas stove, convection microwave oven and a hotplate. My wife designed the kitchen layout so that everything fitted exactly in the right place where she preferred it. We run the gas stove off two 9kg gas bottles which live in an outside locker.
A 3-way fridge was not an option after we experienced one in the small bus. So this time we got a 258 liter 12V compressor fridge. It is working fine except for the freezer section. I believe the insulation is insufficient and I’m planning a fix for it. I will do a post on this excursion when I start the experiment.
If I have to build another motorhome now, I’d likely buy all mains powered equipment instead of 12 volt for it is much cheaper than 12 volt equipment. Because of the good price on solar, you can rather add more panels to drive the equipment. Here is a review from another RV’er that is worth the read if you are in the market for an RV fridge.
This fridge is quite similar to the one I have, but seems to have a better insulated freezer compartment according to the reviews. I can just wish to have gotten mine for this price. I paid almost 4 times this for a second hand one.
We’ve got the Novacool RFU9000.
Handy features of this fridge are the freezer compartment below the fridge as well as the compressor and radiator both underneath. This gives more usable depth to the fridge and lifts it off the ground so you don’t need to curl up like an armadillo to reach the ice-cream.
We mounted our fridge on top of a big drawer that is used for dirty laundry – works great to have the fridge at eye level.
The Donkey Hotplate
We started out with a normal double solid plate hotplate. This did a sluggish job for some years hense the Donkey Hotplate) and eventually started rusting and became a bit unsightly. That meant “Time to upgrade”. Again I did some serious investigation and eventually settled for this absolutely amazing little infra-red hotplate.
The unit is all brushed stainless and looks 100 times better than the old one. When it comes to cooking, it brought the heating time, to boil a liter of water, down from 10 minutes to 2 minutes. I was honestly stunned. Preparing a meal is way faster than it used to be.
That is not all, after 90 seconds you can turn the plate off and it will keep going for quite a long time still. We experienced a major power saving this way when running the cooktop through the inverter. At 1200 Watts per plate, the 1500W inverter can handle one plate at a time.
Here is something similar from Amazon however it is only 1800W (900W x 2):
So you can expect to boil a liter in about 5 to 7 minutes on this one.
What’s up next?
Follow us in the next post where you can see the latest windshield waterproofing, ideas for mobile broadband that works very well and some more interesting gadgets that make life easy. A super low powered dehumidifier, window moist remover and more.

