Some real BIG mistakes to avoid, especially one!
I was watching a few videos on YouTube where people have their bus conversion designs done on camera. What I saw gave me the chills. Most of them made the BIG mistake.
What is the BIG MISTAKE?

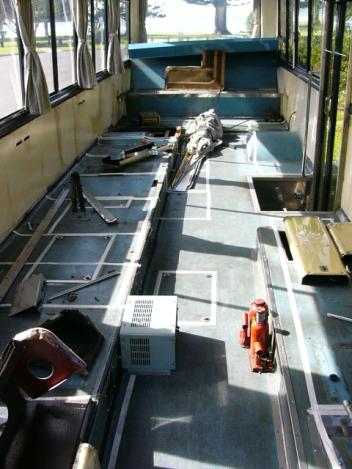
I saw a family getting into the empty bus. They started talking about where they need to fit the items.
They used masking tape on the floor to plot it out (good idea – but much too early).
The trick is not to find space to fit the stuff, the trick is to fit it in the best possible space for ease of use and long term satisfaction.
Undoing such a grave mistake is virtually impossible. I have been in lots of motorhomes that are not selling because of this very reason.
How to start the right way.
First, you need to decide how many people are going to live in the RV / Motorhome most of the time. This is critical to its layout.
Next, you need to decide how often and how many people you’d like to entertain inside. This is as critical because it can vastly impact on the layout.
Once you have decided that, think very carefully about air conditioning. Air conditioning takes a LOT of space and power. If you don’t plan to visit the desert or equator regularly, you may get along well without air con.
Here is the bit that most people don’t do right:
- Measure the inside of your vehicle taking into account any insulation and paneling that will go on the inside walls. (We are now only interested in the available floor space to fit the furniture).
- Draw the inside of the vehicle to scale on a piece of graph paper.
- Measure the big pieces of furniture that will be fitted and draw it on graph paper to the same scale. (Obviously we are only interested in the footprint dimensions at this stage).
- Once you have the fridge, bed, oven, shower tray, toilet, bench tops, sink, dining table, couch etc all drawn on the graph paper, mark each piece clearly and cut it out.
Only now are you ready for a proper planning stage.
Slide the cut-out pieces onto the graph of the motorhome interior. You can easily shuffle things around and take measurements and “live yourself into the motorhome”. After each possible combination, play certain common daily scenarios off in your mind by imagining how the layout will suit if, for instance, you are cooking a meal while having friends on the couch.
Another scenario may be doing the washing while someone wants to use the toilet. This will answer questions like: Is the bathroom in the right and optimal spot? Is it far enough from the kitchen and lounge for privacy? Is it easily accessible from the bedroom?
This way you can fine-tune your motorhome layout to suit your needs and save a lot of frustration and cursing further down the line.
Next Step.
Now that you have moved every item into its perfect location so that the door of the bus can hopefully still open, it is time to put the tape to the floor.
After that is done, have another good look at it and walk through the bus imagining that everything is installed. What does it feel like?
Do you have enough room to walk or do you need to shrink that counter top by a few centimeters?
Can the fridge door open all the way without the bus door connecting it when someone gets in from outside?
These are all real life scenarios to think of which is easily forgotten.
Another major consideration is drawers over cupboards. Having little space as it is in a motorhome, you likely don’t want to crawl on your knees to get hold of that coffee jar that is on the floor level inside the cupboard while your friends are staring at your contortion tricks.
Cupboards are usually dark and lousy to retrieve goods from. Even though a drawer takes a  little more space, in the end it can greatly increase ease of access and add to the enjoyable experience of living in a bus.
If you have enough space above the windows, overhead lockers can be very handy for extra packing space.
Remember to keep the heavy items like canned fruit, glass bottles etc at the bottom and use the overhead lockers for lighter items such as clothing, bedding, dried food and cereals.
This is good practice for a safer and more comfortable ride.
For some more VERY INTERESTING concepts to turn your bus into the ULTIMATE MOTORHOME, just subscribe and get the free e-book. Included is a detailed VIDEO reserved for subscribers only, with a lot of undisclosed tips and tricks that you will be amazed at.
The video shows you some excellent space saving concepts that we have never come across since we did our own design in 2007. That is 11 years!
Having lived in a pre-owned motorhome designed by someone else, it was a good stepping stone to sort out all the nitty gritty stuff. We learned what to do and more importantly what NOT to do. All the great ideas were transferred to our new motorhome and the bad ones discarded, redesigned or upgraded. We designed for permanent living. We knew that we had to get it right the first time. Once it is done, it is done. If we were going to make a mistake, we’d have had to live with it.
I can wholeheartedly say the after living in our bus since Dec 2008, there’s hardly anything that I would do differently if I had to design another one. Something that I would prefer is a fiberglass or alluminum body to the metal. The main reason is rust.
We have almost no corrosion on the bus because I am keeping a tight hand on it but you have to inspect the vehicle regularly and repair immediately and properly when you find corrosion.
Got a bit sidetracked there but I will leave it in the post as it may benefit someone in a similar situation.
Back to the design.
Keep in mind that an aircon unit does not only consume interior space but also a huge storage space underneath and on top.
I have seen many motorhomes with aircon units on the roof and no solar panels. It may be that you decide to travel from one powered campsite to the next and don’t need solar but for permanent living, solar is a given. Always put as much solar on top as you can fit and afford, whichever is your limiting factor.
Solar is easy. If you have too much, like we do during the summer, I run the hot water cylinder through the inverter off the solar. More on that here.
The solar design is no different from the interior design. Again, follow exactly the same plan.
- Measure the roof.
- Measure the panels that you are interested in.
- Draw to scale on graph paper.
- Cut out the scaled panel drawings.
Ready to go. Measure and indicate any satellite dishes and other obstructions on the scale drawing. Now slide the graph paper panels onto the roof drawing to get the best layout.
Always keep in mind that solar does not like shadows. If you have a dish on the roof, try place the solar out of reach of the 10am to 4pm shadow area as far as possible.
How to fit the panels can be viewed in this video.
If you have a comment, that is what the comment box is added for below. Looking forward to hearing from you.


I watched a YouTube video were the family got all excited running inside the empty bus pointing out were they would place everything. And when I watched the YouTube video I must confess that I found it cool! But now reading your post, I recognize, what a mistake. I like the idea of drawing the motorhome interior to scale and also creating cards to scale of each big piece of furniture. I’d spend at least a month figuring all the different possible combinations. I like to design stuff and would like to create cool cards so my time, moving them around, would be enjoyable.
There would be nothing more boring than moving a white card with just the name “sofa” written on it. Finally, I’d obviously keep record of those that seem to fit best, taking a picture of them with my phone. Then I would write pros and cons of those combinations that have come out of this first round.
Yeah, now I would never follow what those YouTube videos make us believe is the correct way of designing a motorhome’s interior.
Hahaha, thanks Henry. I had a good laugh. Some of the youtube videos are really misleading and dangerous. I am glad you find the post interesting. I hope this saved you some headaches.
Have a great day and visit again.
Noah.